
|
How To Assemble A Kerosene Lamp With a Glass Shade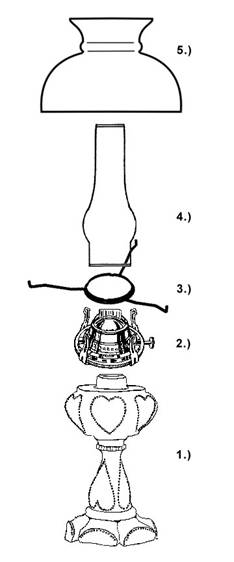
The above illustration should serve as a guide in a step-by-step process in assembling a basic oil lamp. If you purchased your kerosene lamp complete, then all of the parts should assemble without having to bother with measuring for correct fit between components. 1.)Determine the collar size of your lamp. Most collar sizes were standardized during the kerosene era. The collar size of your lamp will, of course, determine the correct size of kerosene burner to use on your lamp. Click this link for a full explanation collar & burner sizes: How To Replace a Kerosene Burner 2.) After having obtained the correct kerosene burner (make sure the wick is proper inserted and that the wick winder functions properly) you may now attach the burner to the lamp. All of Antique Lamp Supplys burners are tested with antique and modern lamps to insure compatibility, but all lamp collars are a little different and some old (and new) lamps may have damaged threads inside the lamp collar. Attach the burner to the lamp (collar) by slowly turning the burner in a clock-wise manner while lightly and evenly pressing down. The mounting procedure will tell you whether or not the burner is a good fit. A good burner-to-collar fit will be characterized by smoothly turning threads and a snug fit when the base of the burner threads fully into the top of the collar. 3.) Selecting the correct shade holder for kerosene or kerosene-style lamps depends upon the size of the burner (e.g. No. 1 or No. 2 size, etc.) and the size of the lampshade you plan to use on the lamp. Antique Lamp Supply lists the proper burner size and shade fitter size for each of our shade holders. If you want to use another shade holder, its compatibility may be somewhat difficult to determine by simple measurement. Some burners of very similar styles, No. 2 brass plated & No. 2 Queen Anne for instance, usually require completely different shade holders. If you want to use your own shade holder on a kerosene lamp burner, your best bet may be to try the actual shade holder on the burner before purchase. To attach the shade holder, in this case a tripod style holder, gently slip the ring portion of the holder inside the kerosene burners tines and squeeze the edges of the ring tightly to the burner, using your thumb and inside portion of the end of your index finger. Often the fit will be very snug. Considerable pressure may be required to make the holder properly seat to the burner. 4.) Mount the chimney by slipping its base inside the springy tines that rise above the burner. Try to apply light pressure to the tines as the chimney goes down so that the chimney will be held in center of the burner. If the tines are bent, remove the chimney and lightly bend them back to perpendicular so that all 4 tines apply equal pressure on the chimney base. Click this link for more information on selecting and mounting kerosene lamp chimney glass: How To Choose The Correct Size Chimney 5.) Mount the lamp shade by allowing the chimney to pass through the middle of the shade and making sure the edge of the glass shade rides down to the base of the holders fitter. For more information on selecting a shade for your lamp please click the following link: How To Choose A Glass Lampshade |